BankMobile Disbursements
IntelleCheck integrates with BankMobile Disbursements to enable colleges and universities to quickly and efficiently distribute financial aid refunds and payroll disbursements electronically.
This page discusses the administrative configuration area for BankMobile Disbursements. For a complete guide to BankMobile Disbursements functionality, refer to Getting Started with BankMobile.
To enable BankMobile Disbursements in IntelleCheck, click on the BankMobile button from the list of administrative tasks. Then, click on green plus icon  to add a BankMobile Disbursements configuration.

Enter the BankMobile Disbursements configuration key provided by your BMTX Implementation Project Manager.
Refund File
Queries – Card File Generation
This is the area to generate the query to create a card file of students and/or employees.
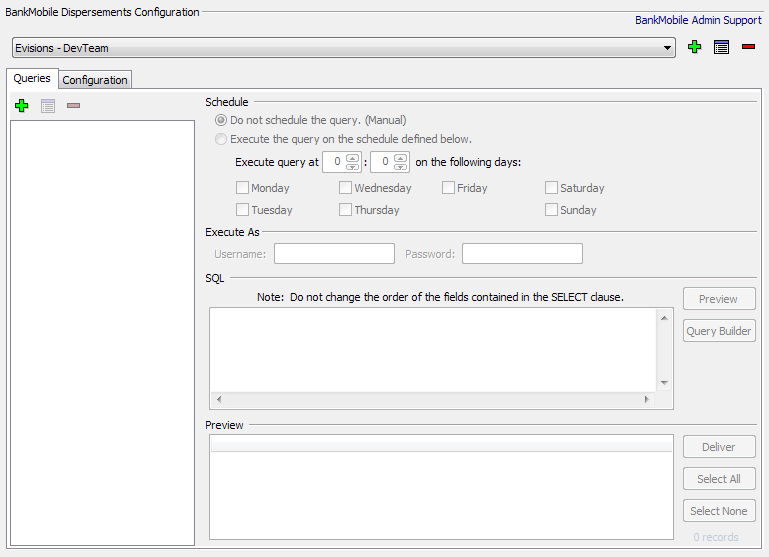
- Schedule: Allows the query to run automatically and deliver the card files. Select the days and time for the query to run and card file to be sent. Be careful to schedule a time which will not interfere with any backups.
- In order to be able to turn on scheduling, you must be logged into IntelleCheck as a MAPS user who has the User Type set to Administrator in the MAPS Config.
- Execute As: Used for scheduled queries. The username must be a MAPS user who has sufficient database permissions to execute the query or inherits permissions based on the ADO Connection properties.
- SQL: After a query has been created using the Query Builder, review the generated SQL and modify the WHERE clause if necessary. Click on the Preview button to see a list and count of students/employees to be sent to BMTX.
- Preview: Displays the results of the SQL and provides a record count. Click on Select All, or select individually, then click the Deliver button to manually send a card file to BMTX. The Deliver button is only enabled when Schedule is set to “Do not schedule the query. (Manual)”
Click on the green plus under the Queries tab to bring up the Add New Query dialog box. Enter a name and select the type of query, Student or Employee. Click OK. Next, click on the Query Builder button on the right.
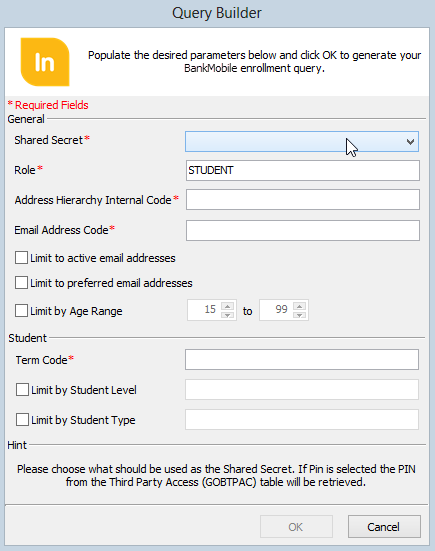
The Query Builder has several input areas and check boxes:
- Shared Secret - Select a format for the shared secret from the list of available options. The shared secret can be constructed from several variations on a partial date of birth and Banner ID number, or using the PIN from the Third Party Access (GOBTPAC) table.
- Role - The role of the users who are being selected in this query. Typically, this value is either 'STUDENT' or 'EMPLOYEE'.
- Address Hierarchy Internal Code - The Banner Crosswalk Validation form (GTVSDAX) allows you to enter hierarchy criteria. This field should be set to the Internal Code that you wish to use. The corresponding Internal Group must be set to 'ADDRESS' on the Crosswalk Validation form.
- Email Address Code - This field should be set to the Email Type you want to retrieve (for example, personal or business) from the Banner Email Address Form (GOAEMAL). Valid choices come from the Email Type Validation (GTVEMAL) table.
- Limit to active email addresses - Check this box to only retrieve active email addresses.
- Limit to preferred email addresses - Check this box to only retrieve email addresses that are indicated as the person's preferred address.
- Limit by age range - Check this box to restrict the query to people within the specified age range. Once checked, you can then set the minimum and maximum ages using the boxes to the right.
Student queries have three additional fields:
- Term Code - Enter the desired term code. Only registered students for terms greater than or equal to the specified term will be retrieved. Valid choices come from the Term Code Validation (STVTERM) table.
- Limit by student level - Check this box to limit the results by student level. Then, enter the student level code(s) for the level(s) of students to retrieve (for example, undergraduate and credit, 'UG C'). Valid choices come from the Student Level Validation (STVLEVL) table. Multiple values should be separated by a space.
- Limit by student type - Check this box to limit the results by student type. Then, enter the student type code(s) for the type(s) of students to retrieve (for example, new and transfers, 'N T'). Valid choices come from the Student Type alidation (STVSTYP) table. Multiple vales should be separated by a space.
Employee queries have two additional Payroll-related fields:
- Limit by Pay ID - Enter the Payroll ID(s) for the employees to retrieve (for example, monthly and biweekly, 'MN BW'). Valid choices come from the Payroll Identification Code Rule (PTRPICT) table. Multiple values should be separated by a space.
- Limit by pay date within last [#] month(s) - Set this field to the desired number of months. Only employees who have been paid within this time period will be retrieved by the query.
Enter values for all of the required fields and any optional criteria, then click OK to generate the SQL.
The SQL field will now be populated with the complete select statement with the criteria entered. This can be manually modified if needed.
Click on the Preview button on the right to view the results of the query. Select individual names or use the Select All button. Click Deliver to send the card file to BMTX.
The queries can be run manually or scheduled to run at a specified time on select days.
Important:
Account Configuration
Next, check the box for each account which will be processing payments from BankMobile Disbursements for the selected configuration.
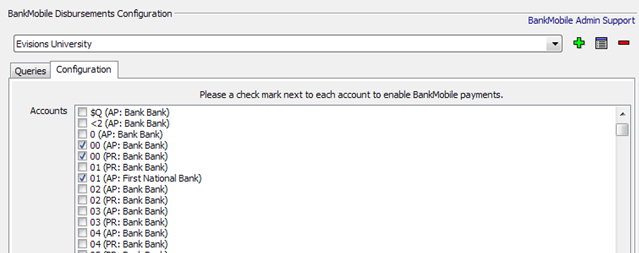
Click the Save button to save the settings.